
Advanced Kubernetes, Part 2: Where Does My Pod Go?
- Intro
- What the scheduler actually does
- Labels: how the scheduler tells nodes apart
- Pulling pods towards nodes: node selectors and node affinity
- Keeping pods away: taints and tolerations
- Placing pods relative to other pods: pod affinity and anti-affinity
- Spreading pods evenly: topology spread constraints
- When there’s no room: priority and preemption
- Debugging a pod stuck in Pending
- Wrapping up
Intro
In part 1 we followed a packet from one pod to another. This time we’re going one step earlier, to the moment a pod is created and Kubernetes has to decide which node it runs on.
Most of the time you never think about this, and that’s the point. But sooner or later you’ll want all three replicas of something on different machines, or a GPU node that only runs GPU work, or a pod that’s been stuck in Pending for twenty minutes for no obvious reason. All of those come down to the scheduler, and to a handful of settings that tell it what you want.
What the scheduler actually does
The scheduler is a single component in the control plane with one job. It watches for pods that don’t have a node yet (their spec.nodeName is empty), picks a node for each one, and writes that choice back to the API. That’s it. It doesn’t start containers. The kubelet on the chosen node sees the pod is now assigned to it and does the rest.
For each pod, the scheduler runs two main steps.
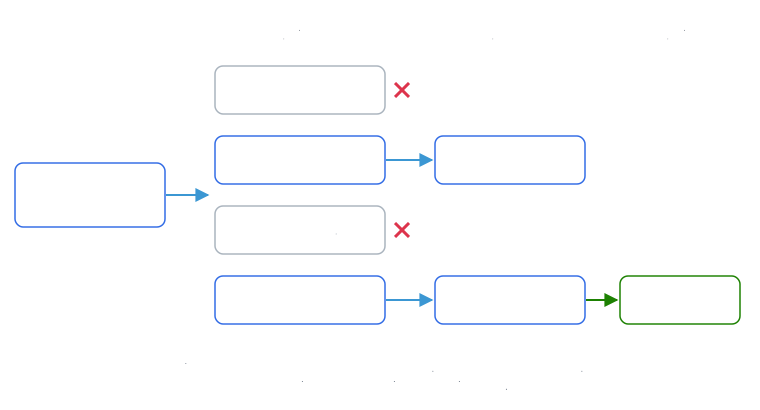
Filtering throws out every node that can’t run the pod at all. Not enough free CPU or memory for the pod’s requests, a taint the pod doesn’t tolerate, a node selector that doesn’t match, a host port that’s already taken: any one of these rules a node out.
Scoring then ranks the nodes that are left. Each scoring plugin gives every node a number, things like “how evenly would this spread the replicas?”, “how balanced would CPU and memory usage be?” and “does this node already have the container image?”. The numbers are added up (with weights), and the highest total wins. Then the scheduler binds the pod to that node.
One thing that surprised me early on: when the scheduler checks whether a pod “fits”, it looks at resource requests, not actual usage. A node that’s sitting at 5% CPU can still be “full” if the pods on it have asked for all of its CPU. We’ll dig into requests and limits properly in the next part.
When filtering leaves zero nodes, the pod stays Pending, and the scheduler tells you why in the pod’s events:
$ kubectl describe pod web-7d9c-xk2lp
...
Events:
  Warning  FailedScheduling  0/4 nodes are available: 1 Insufficient cpu,
           1 node(s) had untolerated taint {gpu: true}, 2 node(s) didn't match
           pod anti-affinity rules.
That message is a breakdown of the filter step, node by node. Once you know what each setting in this post does, you can read it like a checklist.
Labels: how the scheduler tells nodes apart
Almost everything below works by matching labels on nodes. Every node comes with a few useful ones already:
| Label | Example value | Meaning |
|---|---|---|
kubernetes.io/hostname | worker-1 | The node itself |
kubernetes.io/arch | amd64 | CPU architecture |
kubernetes.io/os | linux | Operating system |
topology.kubernetes.io/zone | ca-central-1a | Zone (set by your cloud, or you) |
topology.kubernetes.io/region | ca-central-1 | Region |
You can add your own, and show labels as columns, which makes them easy to check at a glance:
kubectl label node gpu-1 gpu=true
kubectl get nodes -L topology.kubernetes.io/zone,gpu
Pulling pods towards nodes: node selectors and node affinity
The simplest tool is nodeSelector. The pod only goes to nodes that have every label you list:
spec:
  nodeSelector:
    kubernetes.io/arch: arm64
Node affinity does the same job with more control. It has two flavours, and the long names tell you exactly what they do:
spec:
  affinity:
    nodeAffinity:
      # Hard rule: never schedule anywhere that doesn't match
      requiredDuringSchedulingIgnoredDuringExecution:
        nodeSelectorTerms:
          - matchExpressions:
              - key: topology.kubernetes.io/zone
                operator: In
                values: ["ca-central-1a", "ca-central-1b"]
      # Soft rule: prefer these nodes, but go elsewhere if you have to
      preferredDuringSchedulingIgnoredDuringExecution:
        - weight: 50
          preference:
            matchExpressions:
              - key: node.kubernetes.io/instance-type
                operator: In
                values: ["m7g.large"]
“Required” filters nodes out. “Preferred” only adds to a node’s score, so the pod still runs somewhere if nothing matches. The operators go beyond simple equality, too: In, NotIn, Exists, DoesNotExist, Gt and Lt, which means you can say things like “anywhere except these nodes”.
The “IgnoredDuringExecution” half matters. These rules are only checked when the pod is scheduled. If you change a node’s labels afterwards, pods already running there stay put.
Keeping pods away: taints and tolerations
Node affinity is the pod saying where it wants to go. Taints are the node saying who it’ll accept. A taint repels every pod that doesn’t explicitly tolerate it:
kubectl taint nodes gpu-1 gpu=true:NoSchedule
# and to remove it later, add a minus sign:
kubectl taint nodes gpu-1 gpu=true:NoSchedule-
The part after the colon is the effect. NoSchedule keeps new pods off but leaves running ones alone. PreferNoSchedule is the soft version: avoid this node if possible. NoExecute goes further and evicts pods that are already running there unless they tolerate it.
A pod that should be allowed onto that node gets a matching toleration:
spec:
  tolerations:
    - key: gpu
      operator: Equal
      value: "true"
      effect: NoSchedule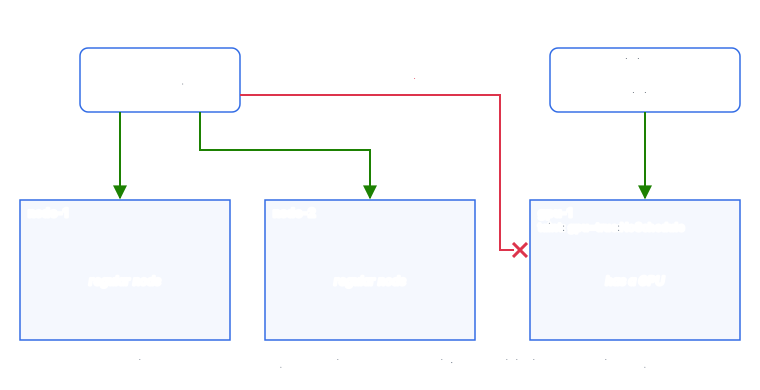
Here’s the bit that trips almost everyone up, me included: a toleration doesn’t attract a pod to the node. It only removes the objection. A pod with the GPU toleration is just as happy to land on a regular node as on the GPU one. If you want “GPU pods go to GPU nodes, and nothing else does”, you need both halves: a taint and toleration to keep other pods off, plus node affinity to pull the GPU pods on.
You’ve already been relying on taints without noticing. Control plane nodes usually carry node-role.kubernetes.io/control-plane:NoSchedule, which is why your apps don’t end up on them. And when a node stops responding, Kubernetes taints it with node.kubernetes.io/unreachable:NoExecute. Every pod gets a default toleration for that taint lasting 300 seconds, which is why pods on a dead node take about five minutes to be rescheduled elsewhere. If that’s too slow for something important, you can set a shorter tolerationSeconds on its toleration.
Placing pods relative to other pods: pod affinity and anti-affinity
So far the rules have been about nodes. Pod affinity and anti-affinity are about other pods: “put me near pods labelled X” or “keep me away from pods labelled X”.
The classic use of anti-affinity is making sure replicas don’t all end up on the same node:
spec:
  affinity:
    podAntiAffinity:
      requiredDuringSchedulingIgnoredDuringExecution:
        - labelSelector:
            matchLabels:
              app: web
          topologyKey: kubernetes.io/hostname
The topologyKey decides what “near” means. With kubernetes.io/hostname, it means the same node. Change it to topology.kubernetes.io/zone and the rule becomes “never two web pods in the same zone”.
Two warnings. First, a required anti-affinity rule like this one means you can never run more replicas than you have nodes. Scale web to five on a four-node cluster and the fifth pod sits in Pending forever. Second, pod affinity rules are expensive to evaluate, because the scheduler has to look at every pod on every node. The Kubernetes docs warn against them on clusters with more than a few hundred nodes. For spreading replicas out, there’s a better tool.
Spreading pods evenly: topology spread constraints
Topology spread constraints say “keep these pods evenly spread across nodes, zones, or any other label”, with a limit on how uneven things are allowed to get:
spec:
  topologySpreadConstraints:
    - maxSkew: 1
      topologyKey: topology.kubernetes.io/zone
      whenUnsatisfiable: DoNotSchedule
      labelSelector:
        matchLabels:
          app: web
    - maxSkew: 1
      topologyKey: kubernetes.io/hostname
      whenUnsatisfiable: ScheduleAnyway
      labelSelector:
        matchLabels:
          app: web
The skew is the difference between the busiest and the emptiest zone (or node). With maxSkew: 1, no zone may have more than one extra matching pod compared to the emptiest one:
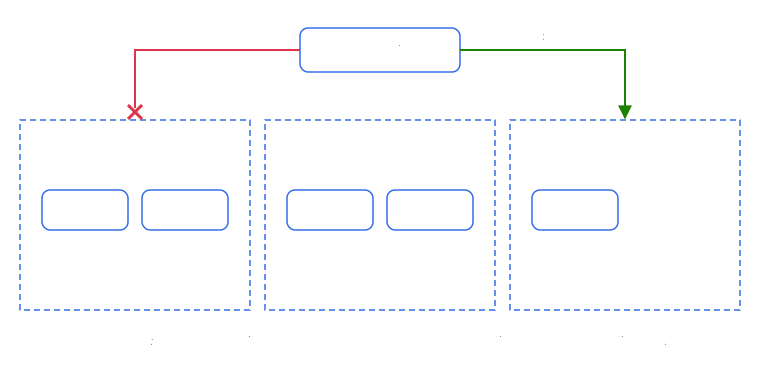
whenUnsatisfiable decides what happens when no node keeps the skew within the limit. DoNotSchedule leaves the pod pending. ScheduleAnyway treats the constraint as a scoring preference instead. The example above combines both: zones are a hard rule, nodes within a zone are a soft one.
Unlike required anti-affinity, this scales past “one replica per node” gracefully. Ten replicas across three zones is fine, they just get spread 4/3/3.
The catch is that spreading only happens at scheduling time. If a zone goes down and its pods get rescheduled into the other two, they stay there after the zone comes back. Kubernetes won’t move running pods to rebalance. The descheduler project exists for exactly this: it evicts pods that break your spread rules, so the scheduler can place them again.
Even with no constraints set, the scheduler applies a gentle spread by default, so replicas of the same workload already lean towards different nodes and zones. Your own constraints are how you turn “lean towards” into “must”.
When there’s no room: priority and preemption
Sometimes the cluster is simply full. Priority decides what happens then. You create PriorityClasses and assign them to pods:
apiVersion: scheduling.k8s.io/v1
kind: PriorityClass
metadata:
  name: business-critical
value: 100000
description: "Customer-facing services. May evict batch jobs to get scheduled."
---
apiVersion: scheduling.k8s.io/v1
kind: PriorityClass
metadata:
  name: batch
value: 1000
preemptionPolicy: Never
description: "Background jobs. Wait for space instead of evicting anything."
Then set priorityClassName: business-critical in a pod spec. Higher-priority pods jump ahead of lower-priority ones in the scheduling queue. If a high-priority pod still can’t fit anywhere, the scheduler looks for a node where evicting some lower-priority pods would make room, evicts them (this is preemption), and schedules the important pod there once space frees up. Pods with preemptionPolicy: Never still jump the queue but never evict anyone.
A few things to keep in mind. Kubernetes ships with two classes of its own, system-cluster-critical and system-node-critical, for things like DNS and the CNI. Leave those to the system. Preemption tries to respect PodDisruptionBudgets, but it doesn’t guarantee to. And priority only helps if it means something: if every team marks their app as critical, you’re back where you started.
Debugging a pod stuck in Pending
When a pod won’t schedule, here’s what I check, roughly in this order:
- Read the event.
kubectl describe pod <name>and look forFailedScheduling. To see every scheduling failure in a namespace at once:kubectl get events --field-selector reason=FailedScheduling. - “Insufficient cpu” or “Insufficient memory”: compare the pod’s requests with what’s free on each node, using
kubectl describe node <name>and its “Allocated resources” section. Remember that it’s requests that count. - “Untolerated taint”: list the taints with
kubectl describe nodes | grep -A2 Taintsand check whether the pod should tolerate one of them. - “Didn’t match node affinity/selector”: check the labels with
kubectl get nodes -L <label>. A typo in a label value fails silently, so look closely. - “Didn’t match pod anti-affinity rules” or “topology spread constraints”: count replicas against nodes or zones. You may be asking for something that can’t exist, like five pods with one-per-node anti-affinity on four nodes.
- Volumes: a PersistentVolume tied to one zone can only be used by pods in that zone, which quietly narrows where the pod can go. More on this in the storage part of the series.
Wrapping up
The scheduler only ever does one thing: filter the nodes, score what’s left, pick the winner. Node affinity, taints, pod affinity, spread constraints and priority are all just ways of feeding it rules for those two steps. When a pod lands somewhere unexpected, or nowhere at all, the question is always which rule filtered or scored it that way.
Next in the series: requests, limits, QoS classes, and why your pod got OOMKilled.
Thanks for reading! If you have questions or spot a mistake, find me on twitter.